The Suspension Lift Kit
 The art of manufacturing springs is what Suspension Supplies Australia was built on, and over the years the tradesmen have proudly applied their spring making skills to build and develop BLUEMAX products for all customers.
It is this skill, quality and attention to detail that has built a strong reputation for Brisbane Springs over the years. These skills have provided the basis for research and testing to develop the range of quality BLUEMAX springs sold here in Australia and exported to other countries.
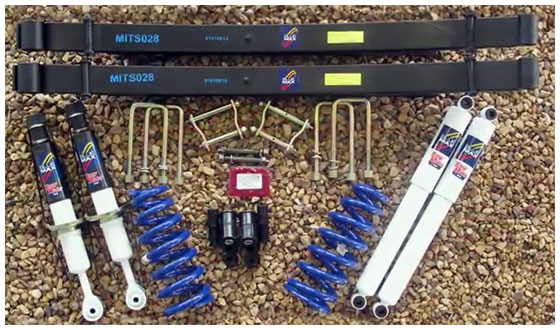
In the video below it shows you what is involved in just one of the types of “lift kits” you can have done at Suspension Supplies Australia. It shows one of the common later model vehicles we encounter and the lift kit is fairly typical of what customers are asking for, which are: to remove the sagged original suspension so that they sit level and can carry a load when required; to give them ground clearance to go off-road; or to simply look better.
An important note at this point!…. We do not want to lift the vehicle any higher than is legally permitted or to a point that would compromise the vehicle’s safe operation.
Front Suspension Replacement
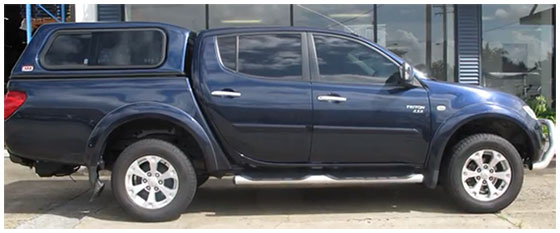
Here we have the vehicle looking typically flat and as our customer reported, unable to carry any load without sagging. The customer also advised that the ride was too bouncy or as we would say uncontrolled.
.

And here’s a sneak peak at our tired looking original front…..and very flat rear suspension.
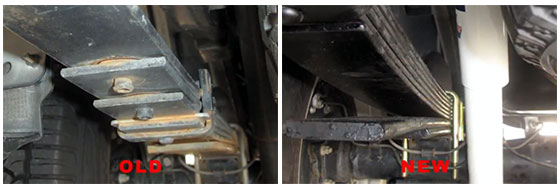
See that the 4 primary leaves are so flat they are constantly engaged with the heavy second stage of the spring which makes for a harsh “pogo stick” ride.
Step by Step Installation
1. Wheels off and start removing the old suspension from the vehicle
2. Remove the spring seat shock absorber and coil as an assembly
3. For this vehicle that involves undoing the upper control arm fixing bolts

4. Disconnecting brake hose retainer brackets
5. Removing the tie rod from its tapered seat

6. Disconnect the lower shock mount bolt
7. Remove the top mount plate fixing nuts
8. Pull the shock and coil assembly down and out of its position

9. Time to dismantle the shock and coil assembly in our pneumatic spring compressor.
10. Remove the top plate for possible reuse by unfastening the top mount fixing nut while the coil is compressed and captured.
11. Once removed, release the coil from its compressed state & then inspect the top mount plate condition.

12. If the mount is still serviceable, lubricate the top plate mount seat with grease to assist the new coil to slip into its correct seat position with ease.
13. Time to reassemble our shock and coil assembly using the chosen new components.
14. Refit our new assembly back into the vehicle

Rear Suspension Replacement
1. With the differential supported – disconnect the top and bottom shock absorber mounts
2. Undo the ubolts securing the spring to the diff

3. Undo the rear shackles and remove them and then the front fixed end pins and the old springs can be taken off the vehicle.

4. Collect the spring chosen to suit this customer’s requirements
5. Lift the spring into position
6. Prelube front fixed pin and rear shackles and assemble to the spring and chassis points
7. Use the grease gun to ensure grease is being delivered to all the correct places on the bush surfaces that you can see. Don’t over do it and leave a mess.

8. Tighten all ubolts to correct tension
9. Recheck pins and shackles are tight
10. Fit the shock absorber into position and tighten the top and bottom fittings on both sides and then it’s time to put the wheels back on and put the vehicle back on the ground

So let’s just have a look at how these rear springs were before. Tired, flat and sitting down on the second stage – And again after, with good camber in the primary spring giving us height and a gradual introduction of all leaves in the spring and a 2nd stage well away but still ready for when the big loads come on and the primary flattens onto it gradually.

NOTE: Point of interest….the 2nd stage starts to work on every part of it that is in contact with the primary spring above, not just when the primary lays right down on it with the ends touching.
Here is the before after vehicle comparison. Improved height and clearance and a guaranteed better ride.

NOTE: ALL IMPROVEMENTS ARE DESIGNED WITHIN THE VEHICLE’S LEGAL LIMITS.
